Concept Information
Alert Notification Management Page
Email Alert Notification Management
Administering Alerts and Tasks
Related Tasks
Searching for Alert Notifications
Searching for Alert Notifications on the Search Page
Viewing Alert Notification Details
Reference Materials
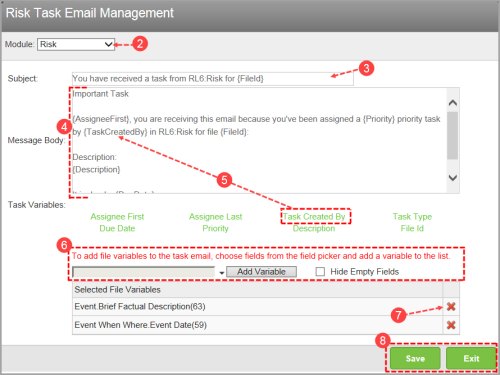
Managing Task Email Notifications
Through task emails, users are notified of tasks to which they are assigned. Emails include links to files as well as additional details, such as due dates and task creators.
The Task Email Management page allows you to
To manage task email notifications:
- Click the Logged in as menu and click Admin A warning that is sent out in the form of an email and/or an in-system alert notification under defined circumstances (e.g. an abnormally high number of complaints or incidents are reported, a high severity incident occurs, or when a file is ignored for a given period of time). Alerts are created by your administrator and are triggered at defined intervals (e.g. daily, weekly, monthly). section, click Task Email Management.
- Choose a module.
- Enter up to 50 characters for the Subject.
- Modify the MessageThe test results are received via a message from the client integration engine to the RL integration engine. Each message may contain one or more test results; these test results only pertain to a single order. Body field, which can contain up to 1000 characters. HTML tags are not supported.
- Insert variables into the message body by positioning your cursor in the Message Body field and clicking:
- Assignee First – first name of the task assignee
- Assignee Last – last name of the task assignee
- Task Created By – first and last name of the user who created the task
- Task Type – Notification, Reminder, Overdue
- Due Date – task due date
- Priority – Low, Normal, High priority as see by the task
- Description – task description
- File Id – ID number of the file to which the task belongs
- To include additional file details in the list of links to files, use the field picker to select file variables:
- Click the drop-down arrow to browse or search for a field.
- Select the field you want to add and click Add Variable.
- (Optional) To hide fields so that they do not appear in the email if they are empty (i.e. no value), check the Hide Empty Fields box. Unchecked, the file field name displays on the email but will show no value.
- To remove a file variable from the email, click the X icon next to the field.
- Click Save and Exit.